
close
Choose Your Site
Global
Social Media

Views: 0 Author: Site Editor Publish Time: 2025-08-05 Origin: Site


Setting up your microphone stand at home is easy and fun. You can get ready to record in only a few minutes. Most people think this setup is easier than other studio equipment. A strong microphone stand stops extra noise and keeps your sound clear. You need a stand that holds your microphone still, blocks shaking, and helps you focus on your music.
Tip: Strong stands help your recordings sound better by keeping the microphone in the right place.
Look at all the parts and check for damage before you put your microphone stand together. This helps you avoid problems later. - Make sure the base is tight by using a tripod or clamp. This keeps your microphone steady and helps stop noise. - Change the height and move the boom arm so the microphone is at your mouth. This helps you get clear sound. - Use the correct microphone holder or shock mount to keep your mic safe. This also helps stop unwanted shaking. - Keep your cables tidy and check if your setup wobbles. This makes sure your recordings are steady and sound professional every time.
Unboxing your desktop mic stand is the first step to getting your home studio ready. You want to make sure you have everything you need before you start recording. The best desktop mic stand comes with all the parts you need for a smooth setup. Let’s walk through what you should do when you open the box.
Take out each piece from the box and lay them on your desk. You should see the main stand, the boom arm, the microphone holder, and any screws or clamps. Some desktop mic stands come in four separate parts. This makes it easy to put together, but you need to check that nothing is missing. If you see a spring-loaded boom arm, handle it carefully. It can snap open quickly.
Here’s a quick checklist to help you:
Main stand base
Boom arm
Microphone holder or clip
Screws and clamps
Instruction manual
If you want the best desktop mic stand experience, double-check that you have every part. Missing pieces can slow you down. You might also notice that some desktop mic stands do not include a storage case. This is normal, but keep the box if you plan to travel with your microphone stand.
Before you start assembling, look at each part closely. You want your desktop mic stand to be strong and safe. Check for scratches, dents, or bent pieces. If you see any damage, contact the seller right away. Most users do not find major problems during unboxing, but it’s smart to check.
Common issues people notice include:
Confusion about the minimum microphone weight needed for the boom arm to work well
Trouble mounting the clamp if your desk does not have a lip
Awkwardness storing the spring-loaded boom arm without a case
You can solve most problems by reading the manual or trying different mounting options. If you want the best desktop mic stand, make sure every part looks good and fits together. This is one of the factors to consider when choosing a microphone studio stand. A sturdy microphone stand helps your microphone stay in place and keeps your recordings clear.
Tip: Always check your desktop mic stand for damage before you start. This saves you time and helps you avoid problems later.

Getting your desktop mic stand ready is a key part of your setup. You want your microphone stand to stay steady while you record. Let’s look at how you can secure the base and make sure it stands strong.
First, decide which type of base your desktop mic stand uses. Most home studios use one of these popular bases:
Microphone Stand Base Type | Description | Advantages |
|---|---|---|
Desktop Stand | Small, compact stands that sit on a desk | Stable for stationary recording, ideal for podcasters and streamers, portable, affordable |
Tripod Stand | Stands with three legs providing a wide base | Excellent stability, suitable for heavier microphones, durable, good for live or outdoor use |
Boom Stand | Stands with an extendable arm for flexible mic positioning | Allows capturing sound from different angles, versatile for instruments and vocals, adjustable height and reach |
Suspension Arm Stand | Desk-mounted articulated arms with clamps | Highly flexible positioning, saves desk space, suitable for heavier mics, integrated cable management |
If you have a desktop mic stand with a tripod base, spread the legs out fully. Place it on a flat surface. For a clamp-style desktop mic stand, open the clamp wide and attach it to the edge of your desk. Tighten the clamp until it feels secure. The best desktop mic stand will not move or wobble when you touch it.
Many desktop mic stands use steel, aluminum, or iron for the base. These materials help your microphone stand last longer and stay stable. Heavy-duty steel or aluminum bases work best for the best desktop mic stand because they absorb vibrations and keep your setup safe.
Now, check that your desktop mic stand feels solid. Push down gently on the base. If it rocks or slides, try these tips:
Move the desktop mic stand to a smoother, flatter spot.
Add a non-slip mat under the base.
Make sure the clamp is tight and the tripod legs are fully open.
A heavy base helps your microphone stand for recording stay balanced. If your desktop mic stand feels light, it may tip over with a heavy microphone. The best desktop mic stand uses a sturdy base to keep your setup safe.
Watch out for common problems. Sometimes, a desktop mic stand becomes unstable if you set it too high or use a cheap model. Always check for worn parts and keep cables tidy. Good cable management stops accidental pulls that can knock over your desktop mic stand.
Tip: Always double-check the base before you finish your setup. A stable desktop mic stand means better sound and fewer problems during recording.
Getting your microphone stand to the right height and angle makes a huge difference in your recording quality. You want your microphone boom arm set up so you feel comfortable and your sound comes out clear. Let’s walk through how you can do this step by step.
Start by deciding how you’ll use your microphone. Are you sitting at a desk for podcasting, or standing for vocals? Each setup needs a different height. Most stands have a twist or grip clutch. You just twist the clutch, slide the pole up or down, and lock it in place. If you use a desktop stand, keep the microphone at mouth level. For studio boom arms, you can go higher, even overhead.
Here’s a quick table to help you choose the right height:
Stand Type | Typical Height Range / Use Case | How to Adjust | Best For |
|---|---|---|---|
Desktop Stand | 8-18 inches (on desk) | Twist clutch | Podcasting, streaming |
Standard Stand | 35-65 inches (floor) | Grip or twist clutch | Vocals, instruments |
Studio Boom Arm | Up to 6 feet (overhead) | Tension screw | Choirs, orchestras |
You want the microphone close enough to pick up your voice, but not so close that you get unwanted noises. Stability matters too. Make sure the base feels solid before you start recording.
Tip: Adjust the height so you don’t have to lean or stretch. This helps you stay relaxed and focused during recording.
Now, let’s talk about the microphone boom arm. Setting up and using a boom arm gives you more control over where your microphone sits. The benefits of using a boom arm for professional sound recording include flexible placement, less strain, and cleaner sound.
Here’s how the position affects your recording:
Move the microphone boom arm so the mic hangs slightly above your mouth. This keeps it out of the direct line of your breath and reduces plosives.
Try aligning the microphone capsule with the bridge of your nose. You’ll speak “under” the mic, which cuts down on mouth noises.
Angle the capsule toward your chin. This helps avoid bass-heavy sounds from being too close.
If you record in a small room, use the boom arm to fine-tune the distance. You’ll get less unwanted noise and a more professional sound.
Microphone boom arms also free up desk space and keep your recording area tidy.
Many boom arms have shock mounts built in. These reduce vibrations and handling noise, giving you clearer recordings.
When choosing the best boom arm for professional sound recording, look for one with smooth adjustment, a sturdy base, and a reliable clutch. You want your microphone boom arm to stay in place once you set it.
Note: The benefits of using a boom arm for professional sound recording show up in every session. You’ll notice less background noise and more comfort.
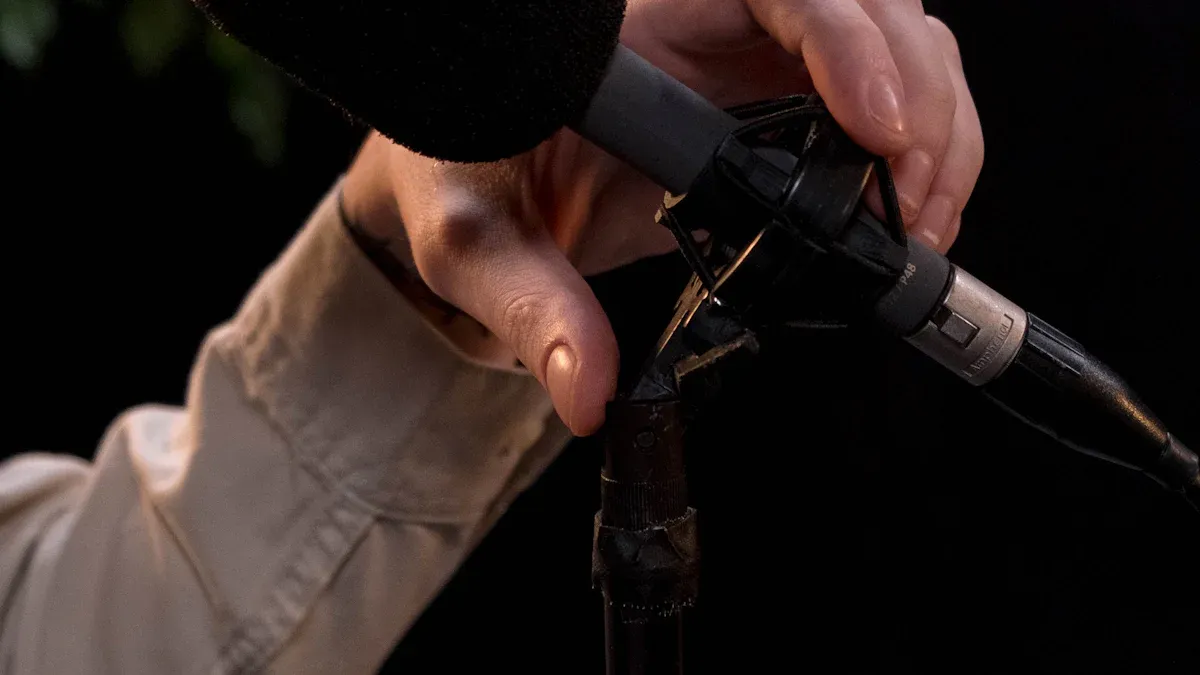
Setting up your microphone holder is very important. It helps your microphone stay safe and sound good. Let’s see how to put on the right holder and fit your microphone the right way.
You can use a clip or a shock mount for your microphone. Each one is good for different needs. Here’s a table to help you choose:
Feature/Aspect | Microphone Clips | Shock Mounts |
|---|---|---|
Primary Function | Hold the microphone in place | Keep microphone safe from bumps and shakes |
Vibration Isolation | None | Yes, stops noise from moving or touching |
Typical Design | Simple clip or holder | Uses elastic bands or springs |
Protection Level | Not much | High, best for sensitive condenser microphones |
Use Case | Quiet rooms with little shaking | Places with lots of movement or for condenser mics |
Size and Portability | Small and easy to carry | Bigger, especially with suspension types |
When to Use | When there is little vibration noise | When you expect vibration or noise |
If you pick a microphone clip, slide your microphone into the holder. This works well if your room is quiet and your stand does not shake. Shock mounts are different. They use elastic bands or springs to hold the microphone. This helps stop noise from footsteps or tapping the desk. Shock mounts are great for condenser microphones because they pick up small sounds.
Tip: If you hear rumbling or background noise, try a shock mount. It can make your sound better.
Now, let’s put your microphone into the holder. You want it to stay in place and not fall out. Here are some tips:
Choose a mount that fits your stand and space.
Make sure the mount feels strong and does not scratch anything.
Look at the threads on the shock mount. Screw your microphone in tight before letting go.
Check the mount often for loose parts. Tighten anything that moves.
Follow your manual to make sure the fit is right.
When you use a shock mount, check that the microphone sits tight in the cage. This keeps your microphone safe and stops it from slipping. If you use a clip, push the microphone in until it feels firm. A tight fit lets you record without worrying about your microphone moving.
Note: A good microphone holder helps you record without problems and keeps your sound clear.
You are almost ready to record. Now, put your microphone on the stand. Hold the microphone gently. Slide it into the holder or shock mount. Make sure the microphone boom arm points at your mouth or instrument. If you use a boom arm, set the microphone just above your mouth or instrument. This helps you get clear sound and blocks extra noise.
Try different spots for your microphone. Move it closer or farther from your mouth. Say or sing a few words. Listen to how your voice sounds. If the microphone is too close, your voice may sound deep or loud. If it is too far, you might lose details. Try putting the microphone at forehead level for a natural sound. Change the angle for a brighter or softer tone.
Tip: Always test where you put your microphone before you record. Small changes can make your sound much better.
After you place the microphone, check all the connections. Loosen the parts before you move anything. This keeps your stand safe. Tighten screws and bolts, but do not make them too tight. If you force them, you could break the threads or hurt the hardware. Make sure the microphone boom arm is locked. If you use a clamp, check that it holds the desk well.
Here is a quick checklist for tightening:
Twist knobs until they feel snug, not tight.
Check the microphone boom arm for loose joints.
Make sure the holder or shock mount is secure.
Look at the cable and run it along the boom arm and under a leg to stop tipping.
Be gentle with your microphone stand. If you fold or store it, move slowly so you do not bend parts. Clean and check your stand often to help it last longer.
Before you record, test your setup for wobble. Push gently on the boom arm and base. If the stand shakes or moves, fix it before you record. Use a heavy base to keep your microphone stand steady. Tripod bases work well because they spread weight. Rubber feet help stop sliding on smooth floors.
Here is a table with ways to stop wobble:
Strategy | How It Helps |
|---|---|
Heavy Base | Balances the microphone’s weight and absorbs vibrations. |
Tripod Base | Spreads weight for better stability. |
Non-Slip Rubber Feet | Stops sliding on floors and desks. |
Locking Mechanisms | Holds the boom arm and stand parts tight. |
Cable Management | Keeps cables neat and stops pulls. |
Regular Maintenance | Keeps the stand strong and stable. |
Sturdy Materials | Holds heavy microphones and lasts longer. |
Weight Capacity | Makes sure the stand can hold your microphone. |
If you see wobble, check if your stand fits your microphone’s weight. Sometimes, using a stand made for light microphones causes problems. Always pick a microphone stand that works for your setup.
Note: A steady microphone boom arm and stand help you record well and get great sound.
You want your home recording studio to sound amazing. I know how important it is to get every detail right. At Jieyong, we design and build the best microphone stands for home studio setups, so you can focus on your music and voice. Let’s look at some tips that help you get the most out of your studio.
A pop filter helps you block harsh sounds from your mouth, like "p" and "b." You should place the pop filter about two inches from your microphone. This distance stops plosives and keeps your recording clear. If you record vocals, try moving the pop filter a little closer or farther until you hear the best sound. The benefits of using a boom arm for professional sound recording include easy pop filter adjustment. You can swing the arm and pop filter into the perfect spot. Always check the pop filter before you start recording. Good placement means less editing later.
Messy cables can ruin your home recording studio. You want your cables neat and safe. Here are some ways to keep your studio tidy:
Use cables that fit your space. Long cables make clutter.
Bundle cables with Velcro straps or zip ties.
Keep audio and power cables apart to avoid noise.
Mark each cable so you know what it connects to.
Plan your cable layout for future gear.
Store extra cables in bins or racks.
Use cable snakes for multi-mic setups.
If you use a microphone stand or speaker stand from Jieyong, you get strong cable holders and easy routing. Choosing the best boom arm for professional sound recording helps you keep cables off your desk. These factors to consider when choosing a microphone studio stand make your studio safer and more organized.
Many people make simple mistakes in their home recording studio. Here’s a table to help you avoid them:
Mistake | How It Happens | How to Fix It |
|---|---|---|
Poor acoustic treatment | Bare walls and floors reflect sound | Add acoustic panels, blankets, or pillows |
Wrong room choice | Hard surfaces and windows cause echo | Pick a room with soft furnishings |
Bad microphone placement | Mic too close to walls or corners | Move mic away from walls and center |
Ignoring pop filter | Plosives ruin vocal recordings | Always use a pop filter |
Messy cables | Cables cross and tangle | Use cable ties and plan your layout |
Noisy background | Fans, pets, and street sounds | Record in quiet, treated spaces |
You want your studio to sound great every time. Acoustic treatment is key. Try different setups until you find what works for your home. The best microphone stands for home studio use help you get stable, clear recordings. If you need help, check out testimonials from other Jieyong users. They love how our stands improve their studio sound.
Ready to upgrade your home recording studio? Explore Jieyong’s microphone stands and accessories for the best results.
You now know how to set up your microphone stand in five simple steps. Anyone can make a nice home recording studio with the right setup. If you check that your stand is steady and in the right spot, you will not have problems when you record. Experts say a steady microphone stand helps your music sound smooth and keeps your gear safe.
A good setup gives you clearer sound, less noise, and makes your studio more comfortable.
Good acoustic treatment and careful setup help you get the best results every time you record.
Always remember, every home studio needs strong acoustic treatment and a setup you can trust. You can start recording with confidence and enjoy clear, pro-level sound at home!
You can gently push the stand and see if it wobbles. If it stays still, you are good to go. Try using a heavy base or rubber feet for extra stability.
Tip: Always check your stand before you start recording!
Most microphones fit Jieyong stands. You just need to match the holder or shock mount size. If your mic feels loose, try a different clip or mount.
Set the microphone at mouth level when you sit or stand. This helps you get clear sound. Adjust the height until you feel comfortable and relaxed.
Activity | Recommended Height |
|---|---|
Podcasting | 8–18 inches |
Singing | 35–65 inches |
You can use Velcro straps, zip ties, or cable clips. Run cables along the boom arm or under the stand. Neat cables help you avoid tripping and keep your studio organized.
A pop filter blocks harsh sounds like "p" and "b." Place it about two inches from your microphone. You get smoother vocals and less editing later.
Pro Tip: Pop filters make your recordings sound professional!